This is the english version of an article I wrote a while ago.
The fragment of an apron dress found in Hedeby has a plait braided from six threads in red and yellow sewn over a tuck. A black and white photograph and a reconstruction sketch can be found in the book „Die Textilfunde aus dem Hafen von Haithabu“ (German for: „The textile finds from the harbour of hedeby“) from Inga Hägg. For the apron dress of my wife Bine i wanted to have plaits and therefor I have invested some time in the matter „braiding with six threads“.
Finding the pattern
There are a lot of different tutorials for braiding with six threads on the internet. I have tried some of them and compared the result with the drawing in the book. Unfortunately none of the experiments looked alike.
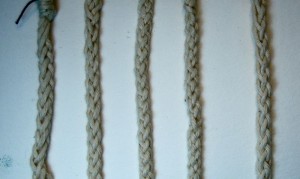
Next I tried to extract the pattern from the drawing in the book by myself. First I made sketches on paper and then experiments with a thick string. At the end of the afternoon I managed to braid a pattern that looked like the drawing in the book.
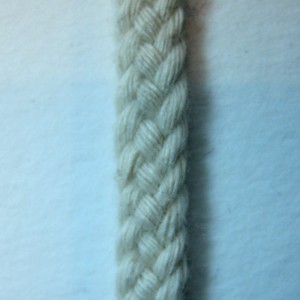
Experimenting with the colors
Getting the colors right was the next problem. The drawing in the book gives no indication of which are the three yellow and the three red threads. I tried two different possibilities with three red and three grey threads: All threads of a color on each side and alternating red and grey threads. The first patterns looks weird but the second pattern looks rather good. I did not try any other possibilities.
How to braid the plait
The pattern is fairly easy to to: Start with three threads on each side with alternating colors.
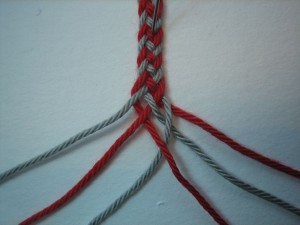
1. Put the thread on the right over the other two threads to the center
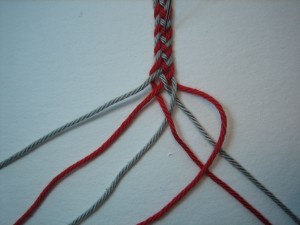
2. Put the thread on the left under the other two left threads and over the thread you moved in the first step
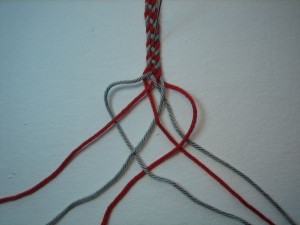
3. Pull tight and start over
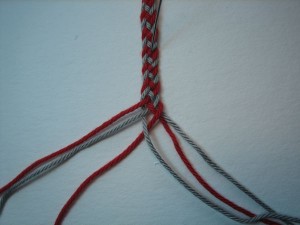
Be careful with the tension. If you pull too tight the pattern will be on the backside of the plait. That is not a problem if you pull evenly. The pattern alternates between the front and the back if you don’t keep an even tension.
Conclusion
I am quite pleased with my trials and the resulting plait. The pattern looks like the drawing in the book but I can not tell if it is the „right“ technique.
Feel free to post comments or send me e-mails if you have any questions.
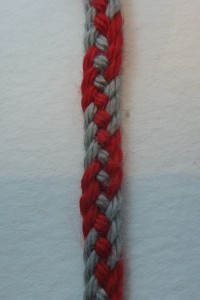
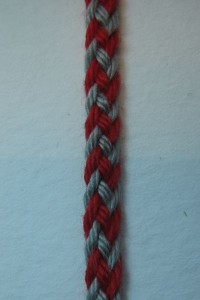
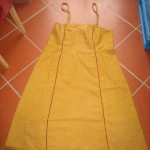
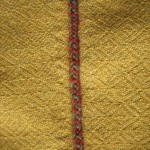
Below are some pictures of the finished apron dress made from a plant dyed diamond twill wool fabric with a plait done with plant dyed red and green wool threads.

11 Antworten auf „Plait from the Hedeby apron dress fragment“
[…] garment. It was tricky finding a good description of the braid itself, but thankfully there is PLAIT FROM THE HEDEBY APRON DRESS FRAGMENT, where another wonderful person detailed her reconstruction of the braid and provided a tutorial on […]
Hi
Great post. I will try to make this band following your guidelines. I was just wondering if you could post a photo of the book with the drawing and photo of the find it would complete your post to near perfect😉 i am very curious to see the original.
Good work
Linnea
Hej, yes great post! Now I am inspired to try again 🙂
Linda
Thanks a lot! Saw your blog in Viking clothing at Facebook.
how did you attach to dress?
Nothing special, just sewed it on with a fine wool thread.
I will not post any copyrighted material scanned from books to this blog. You have to find it in a library and look up the images of the original. Sorry…
When you say: „Start with three threads on each side with alternating colors.“ can you please post a picture?
If you’re using three threads on each side, isn’t that three very very long threads, held in the middle? And if you’re using three very, very long threads, that would be two of red, one of grey, right?
So, perhaps a picture? Thank you.
I actually attach the threads to the garment at the beginning. Clamped the ends at the desired length, stitched it in place then sewed the ends into the shirt and knoted it.
Looks great! What size wool did you use? I’ve tried a couple times and just can’t get it to look right
I used different sized cotton and wool yarns to practice and a wool yarn approx. 2mm thick for the final piece shown in the pictures. But the wool thickness should not be a problem for the pattern to look right, it should work with any type of string…